Please Read ALL instructions BEFORE attempting to load the alpaca
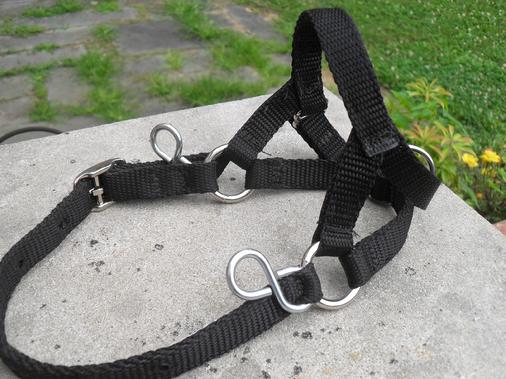
The PacaTrapper is shipped with 3 blue long straps, 2 black slightly longer straps (for belly strap), 1 short post strap (olive), 4 quick release snaps, 1 neoprene cushioned belly strap, 3) 3" bolts with washers, 10 threaded/nut 4" eye bolts, 4 eye wood bolts, 2) 4" x 1/2" bolts used for positioning pins, 1 receiver, 2 tubular arms with attached 5 eyebolts. Installation Tools you will need: �� drill bit, drill, cresent wrench, tape measure. Find a suitable buried post *(min 4X4 in good condition) in your barn that looks most convenient for your dental work and ultrasounds, toenail trimmings. ****The PacaTrapper should ONLY be installed on a 4"x4" or larger buried post with a FLAT side. DO NOT attach to plywood siding or 2x4 or 2x6 cross members. They may not be strong enough. Measure from floor 64", 61", 57" and mark it on the post. This will be the height of the bottom of the receiver ,
Dependinghow tall the user is ��.
If you are 5�10� and taller use 64" mark 5�9�- 5�6� use 61�mark Under 5�6� use the 57� mark
If you are very short,no problems, You may need to buy 4 double ended snaps at the hardware store to extend thequick release snaps lower so that you can reach the quick release snaps. SHORTYTIP: Have a buddy hold up an arm against the post---and keep lowering that arm until you find the position where you can easily reach the eyebolts on the arms, so that you could quickly release a strap Place your receiver on the post and mark your holes (2 bolt holes on top side). I recommend you do the bottom hole first. Use a �� drill bit to drill pilot holes 2.5� deep for the bolts. If you have an older barn and are concerned about the condition of the wood of your post, I recommend using 1/2" x 8" bolts and putting the bolt through the other side and anchoring with washers and nuts. Bottom line is, this receiver needs to be very secure without risk of pulling out of post, So please mount carefully. Mount the receiver VERY tightly on the post. (If you have more than one barn that you work out of, consider ordering extra receivers for your other buildings) Next, place the arms into the cylinders on the left and right of the receiver---each arm should arch out, then the ends should arch toward one another---inward. Once the arms are in the receiver, you will need to put the positioning pins through the holes at the bottom of the receiver�through both arm and receiver.When you want to move the arms to the sides, when the trapper is not in use, remove the pins, rotate the arms out; put the pins in a safe place where you will remember them.Never use the trapper until the arms are rotated back into position and the pins are in place. Eye Bolts
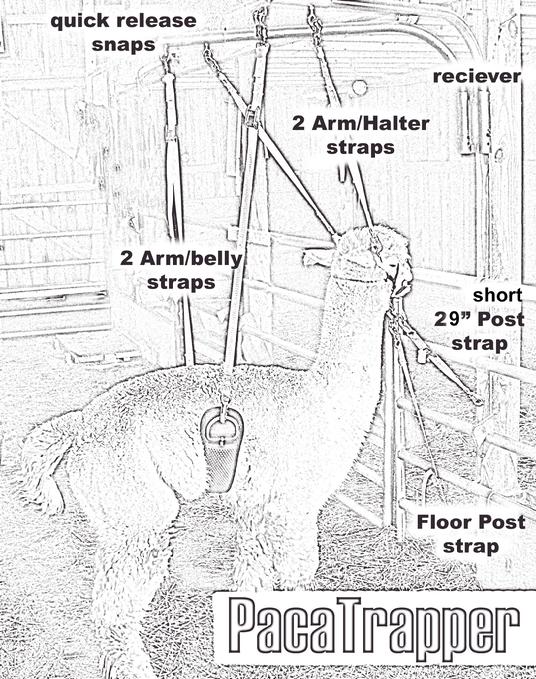
Screw in one wood eye bolt 1" off the floor. (position to the right side of facing post). A Blue strap will hook to this eye bolt. Screw in another eye bolt 30" off the floor. (I like to place on the right SIDE of the post as far back as possible to allow more strap adjustments See Photo). The olive shortstrap will hook to this eye bolt Screw in another wood eye bolt a few inches above the receiver, this will provide you with a place to store your straps when not in use. The extra eye bolt can be used for additional location (recommend 21�-25" for smaller alpacas). Consider mounting several eyebolts at different heights for adjusting to different size alpacas. Attach your quick release snaps to the 4 eye bolts on the arm tubes. Attach them toeyebolt closest to thepost on each arm. The other 2 quick release snaps attach to middle eyebolt on each arm.. Attach the the fixed end of the blue long straps to the quick releases closest to the post and let the adjustable end dangle.
Straps
Always connect the fixed short end of strap to the quick releases or the post. This orients the Strap for the most advantageous pulling leverage. There are six straps; one short olive, 2 long black, 3 long blue straps.In addition, there are 4 quick release snaps and a belly strap which attaches to the long black straps.Each strap has a fixed short part with a snap and a longer, adjustable end which has a pull end whichgoes through an adjustable cleat, andhas the snap end on the other side of the cleat.Pulling on one end of this strap causes the other end to go through the cleat and tighten or loosen.For ease in understanding---we will call the two parts:the �fixed strap� end and the �adjustable strap� end. Attach the adjustable end of the long blue strap to the belly strap ring. Attach the straps by the fixed end to the quick release snaps. The idea is to have a set of straps close to the receiver end of the arms; a second set at the bend of the arms---for the belly band; and the last 2 straps (olive and shorter blue) go on the eye-bolts in the post---to help hold the alpaca�s halter from belowand level with the animal�s nose.The trick here is to know which end of the strap goes to the bolt---and which to the paca.For the straps on the post, use the short fixed end at the eye-bolt and the adjustable end hanging loose to attach to the alpaca�s halter. Attach black straps to the belly band, placing the short fixed end up on the arm�s eye bolt, attached to the quick release snap.The other, adjustable end goes to the belly band. Attach only one side to the quick release snaps. The other side will be left off until the alpaca is brought over to the PacaTrapper. I leave the adjustable strap maxed out in length, and laying neatly on ground awaiting my need to hook it up once the alpaca is in position.
USING THE PACA TRAPPER
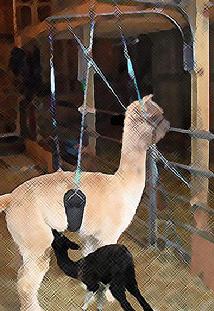
This takes a little practice.Start with a halter, no alpaca!Lead an imaginary paca in a halter to the post . It�s important to have a clear vision of the sequence BEFORE your first loading. Practice with halter only(no animal in halter). Then start with your mostLaid back alpacas until you learn this new tool. 1.When you walk your imaginary paca up by its lead rope, attach the 30� olive strap to that same ring where the lead rope is attached. 2.Next attach the longer of the two post straps (coming from 1� from the floor) to attach where the lead rope was; but do not remove the lead rope yet. 3.Attach the halter by the two side rings, at 10 and 2 o�clock,to the pair of straps hanging closest to the receiver.When the straps are properly placed the paca�s nose is level, not pulled down or up. At this point you may need to adjust straps to level the nose. The nose of the alpaca should be approximately 12" away from post (adjust strap as needed). All of these straps should be VERY, VERY tight, this does not hurt the alpaca, it is simply pulling on the halter not the alpaca head.Now that the �alpaca� is firmly held by its head in 3 directions, you can remove your lead rope.Place it nearby or on an extra eye bolt fixed at an easy height to whichever is the more convenient side of the post for you as you are working. If your alpaca decides to cush at this point, you will need to loosen the arm/halter straps to allow them to get back on their feet again. Then tighten straps again. 4.Adjust the strap holding the belly band so it is very loose under your imaginary paca.Be sure the free hanging member of that pair of straps is djusted long for the moment. 5.Pick the end of the belly band which is not yet attached to the final strap---and bring it up underneath your imaginary paca.Attach the belly band to the quick release snap on arm and pull that pair of straps comfortably tight under the imaginary paca.Be sure that the strap is slightly behind the ribs and not on the penis or teats.With pregnant animals, try to insure that the strap is not in place very long----less than two minutes is optimum.IF the strap slips, try misting it lightly with water to help stop it slipping on the animal�s belly.I recommend a helper with the first alpaca or two until you get the procedure mastered.After that, it is easy to go it alone. Several eye bolt positions are available on the PacaTrapper arms to optimize the safest position. The cushioned belly strap should be pulled snug, and the alpaca should be comfortable. When snugging up the belly strap, adjust tension of the strap to the point of �Putting the alpaca�s back feet on their tippy toes�. The belly strap's function is to prevent them from cushing and prevent their back end from walking away. If this is too loose, the alpaca�s back legs will be able to walk around too much and they will still have leverage in their legs.The failure to make this very snug has been new users biggest problem . If the alpaca has leverage in their legs they can still do stupid stuff! The best case scenario is to have the alpaca continue standing on all four legs supporting themselves equally on all four legs. Some alpacas may need more halter training if they are uncontrollable use your best judgement. 6.Should the animal cush before getting the belly strap attached, Be ready to quickly loosen the nose strapsorgrab the quick release snaps to allow the animal to regain its feet, then begin again. 7.To release an alpaca, reverse the procedure---begin with the belly band, then attach the lead rope and release the halter holding straps.Lead your alpaca successfully away. The paca is standing on its tip-toes, but is not held off the ground.The paca should still be standing on all four feet; feet should still touch the ground. PacaTrapper arms flexing- the flexing is a good thing, and was intentionally designed into the PacaTrapper to give more of a softer landing on their belly. I did not want the animals to subject their abdomen to a harsh abrupt jolt in the belly strap if and when they tried to jump. Another advantage of the "flexing" is that when you pull down on the belly straps to tighten, the arms flex down slightly( about an inch), allowing the belly strap to "lift" the alpaca a little bit more off the floor when you release the straps. In other words, the flex helps lift the alpacas onto their tippy toes, which is a critical working point to the PacaTrapper
SAFETY CONSIDERATIONS:
No alpaca should ever be left unattended in the trapper.
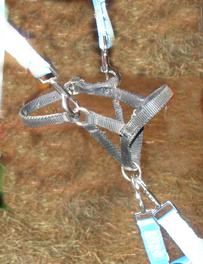
2.Only halter broken alpacas should be placed in the trapper. 3.Try to have all your tools, clippers, syringes, etc., assembled before you bring the alpaca into the trapper. 4.Be sure that the alpaca�s halter fits the alpaca properly before the alpaca is attached to the Alpaca Trapper. All halters fit each alpaca differently, some brands of halters, may need you to add S-hooks to your halter to prevent straps from going across alpaca�s eyes, see picture. By changing eyebolt locations on arms and/or by changing height of receiver, the angle of the strap can be changed to avoid the eye. The �strap in the eye� can be avoided, also by using S- hooks on the halters as pictured) 5.Always release any animal that is very frightened rather than continuing with your plans. 6.Be sure that the alpaca is weight bearing evenly on all four feet---with about 10� of play allowed in the rear feet. 7.Sometimes having a buddy nearby will help a frightened alpaca feel secure, so arrange to allow friends near for first time users. 8.Insure that you loosen your adjustable straps between animals so that you can easily snug them up for each animal.These procedures take on a rhythm after a few tries. 9.This device is rated to handle maximum 275lbs. Camelids.
snap avoids eye
hook up points on halter
quick release hookup on arms
Print and laminate this page and attach to post
Quick review
Connect short end of straps to the arms or post. Or, to say another way, always attach the long segment end of strap to halter or belly cinch. This orients the Strap for the most advantageous pulling leverage.
Practice these steps with a halter (no animal) hooked up to straps
1. connect short post strap to halter chin ring 2. connect left arm strap to halter left side ring (2 o�clock position) 3. connect right arm strap to halter right side ring 4. pull and tighten both straps equally and note if you need to adjust nose up or down 5. attach the floor strap to halter chin ring and pull tight 6. Okay, relax, the alpaca is secure. Some alpacas are good to go. 7. attach right belly strap to arm quick release snap, slide right side strap under alpaca and connect to left arm ....pull tension to get the alpaca on its back toes They should not be able to move back end more than about 10" either way. You want the alpaca supporting most of its weight on their own legs. If too loose, the alpaca will be able to move their back end and will result in unsafe setup also allowing strap to slip out of position. 8. Reverse these steps to unload alpaca.
Send us an Email Don & Carolyn Marquette Don Cell # 330-618-9768 2251 Sesame St Carolyn Cell # 330-618-9769 Mogadore, Ohio 44260